How to Make Your Own Subliminal for Free (ULTIMATE guide)
This in-depth guide teaches you how to make your own subliminal for free with Audacity from writing good affirmations, recording them and finally making your own subliminal audio.
Alternatively, use our free Online Subliminal Maker.
Table of Contents (Click to Show)
Quick introduction about affirmations
What are affirmations?
To affirm a statement is to ‘state emphatically or publicly’ according to the Oxford dictionary.
When we express affirming statements intentionally, these statements become affirmations.
Benefits of affirmations
If you have a goal you would like to reach or behavior you want to change, using affirmations is one way to get there.
We can use affirmations to state something about ourselves that we wish to be true. These statements then act as a support to drive us towards certain behavior we’d like to embody.
Affirmations can be used to reset subconscious negative thought patterns – procrastination, negativity. We can use them to foster positive habits – productivity, confidence, etc. that override the negative behaviors we want to avoid.
Benefits of recording affirmations
Most of the behavior folks would like to change are driven by subconscious thoughts; to change these behaviors means we need to reprogram our negative thoughts.
Repetition is one of the best ways to replace negative thoughts, so listening to affirmations on repeat is a good method of changing our thoughts and behaviors.
With recorded affirmations, you can listen to them when you’d like, as often as you’d like.
The benefit of recording affirmations in your own voice
Recording in your own voice allows you to place the emphasis where you need it in your affirming statements.
Though you can listen to affirmations recorded by someone else, recording in your own voice will reduce any resistance to accepting the message.
Why Audacity?
Audacity is a free audio software that is relatively easy to use and install. Below we’ll take you through the steps necessary to record your affirmation.
Step 1: How to write the affirmations
Make sure to read our guide How to Write Affirmations That Actually Work but here follow some key points for your convenience.
First, you need to pinpoint what you’d like to change. Say you have a goal to get a promotion but are reluctant to speak up in meetings, then perhaps your confidence needs a boost. In this case, you would create a confidence-boosting affirmation.
The subconscious doesn’t recognize negatives, so instead of affirming ‘I won’t be shy anymore’ affirm ‘I am confident in my abilities. It also helps to keep the affirmations short.
Be precise in your affirmations – ‘I would like to be more confident’ would be better written as ‘I am confident in my skills. Notice the use of the present tense. This is important; speak as if the wished behavior already exists.
Always use present tense or natural speaking.
Remember affirmations are for positive statements, avoid use negative statements in your affirmation ‘I need to eat fewer snacks’ should be ‘I enjoy eating healthy snacks.’
Using terms like ’need’ or ‘want’ affirms lack, that you are deficient in some way; avoid using them in affirmations.
For goals that are a stretch where you may not believe you can exhibit the behavior, try easing into it. E.g., you’d like to run a marathon but have never even jogged before, start small, incrementally and build up to affirming your ability to run a marathon ‘I am willing to try jogging’ to ‘I am a jogger’ to ‘I am willing to jog a marathon to ‘I am a marathoner.’
Affirmations work well with visualizations. In our confidence example, as you are saying, ‘I am confident in my skills,’ imagine yourself in a meeting confidently making points on an issue.
Combining the strategies above – affirmation, repetition, visualization – is a very effective way to reprogram and undo the subconscious messages in your mind.
Make a note of the affirmation you have decided to use.
Step 2: How to record affirmations
Option 1: Record using text-to-speech engines to transform written affirmations into audio
Most devices these days have text-to-speech features. We’ll use Microsoft Word in this example; the basic steps will apply to most text-to-speech applications.
To record your affirmation, you can use the voice recorder on your laptop or mobile phone.
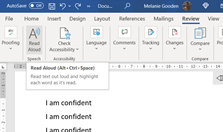
- Open a new Word document.
- Type in your affirmation, e.g., I am confident. Place your cursor at the beginning of the text.
- On the Review tab, click Read aloud to have your affirmation read back to you.
- If you’re happy with the reading, you can copy and paste the affirmation over several lines on the page. This will create a loop of the affirmation when recording.
- Select all the text in your document.
- Turn on the voice recorder application on your device, click Read aloud, record your affirmation.
You now have your affirmation available on your device to play as needed.
Option 2: Recording with a mobile phone
- Open voice recorder application.
- Click Record.
- Say your affirmation several times.
- Click the Stop button.
- Save and name your recording.
- Play the recording back whenever you would like to hear your affirmation.
Option 3: Record affirmations using your own voice using Audacity
Audacity is a free audio editing software. If you do not already have Audacity on your device, go to the Audacity website https://www.audacityteam.org. Follow the steps to install the latest version.
-
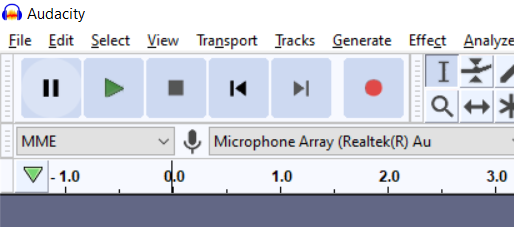
Open Audacity.

-
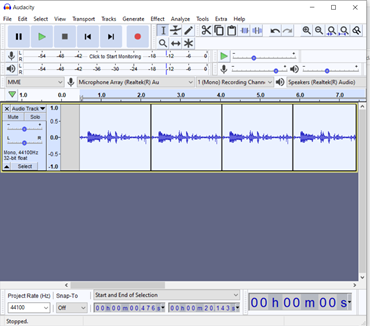
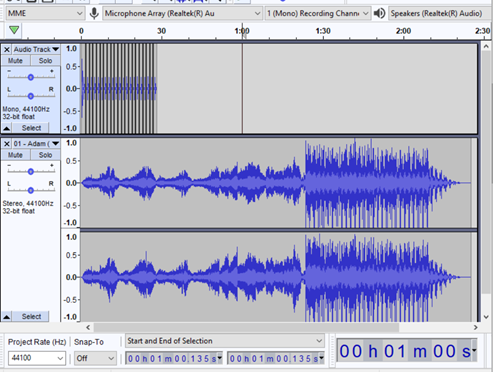
The Audacity Device Toolbar is just above the ruler; confirm the Audio host, Recording device, Recording channel, and Playback settings match the details below and are shown in the screenshot:
- Audio Host = MME
- Recording device = Microphone
- Recording channel = (Mono) Recording Channel NOTE: The recording will play as stereo in your headphones
- Playback device = Speakers

-
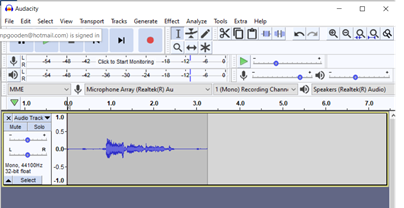
Click the Record button on the toolbar, the red dot, or press the letter ‘R’s on the keyboard.
-
Say your affirmation once.
-
When done recording, press the Stop button, the black square icon on the toolbar, or press the space bar on the keyboard.

-
Audacity has created an audio track of your affirmation
-
Press Play to listen to the recording; note there is silence in the recording before and after your voice. We can remove them shortly.
-
How to repeat a recording for looping purposes
-
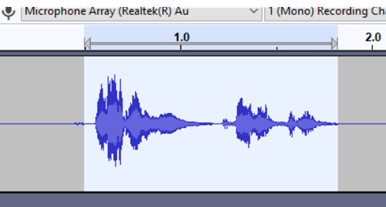
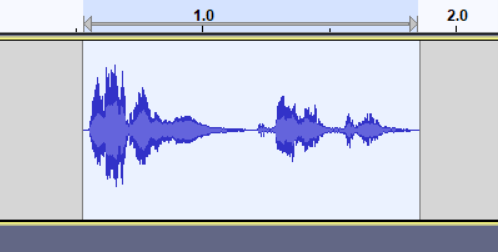
View your recording; you’ll notice that the waves are larger when you are speaking. We now want to isolate your voice and remove the silences at the beginning and end of the recording.
-
Using your mouse, select the section of audio where your speech is, include a little silence on either side – at the beginning and end of the audio.
-
Leaving the selection highlighted, press the space bar to play the selection.
-
Expand or decrease the area selected to ensure you capture all your words.
-
Highlight your speech again, press CTRL+T; this trims the recording to your selection.
-
Use the Repeat function to repeat the audio clip multiple times in this recording.
-
Select the audio (CTRL-A).
-
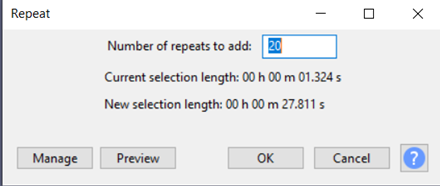
On the menu, select Effect, Repeat.
-
The Repeat window opens with a space to enter the number of repetitions you want. The Current selection length is displayed; the New selection length will adjust depending on the number of repeats you enter.
-
In the number of repeats to add a field, enter the number of times to repeat the audio clip/affirmation in your recording, e.g., 20
-
Click Preview to hear a sample of the loop.
-
Click OK to save your changes.
-
The audio clip is repeated 20 times, or however many times you indicated
Step 3: How to turn affirmations into subliminals using Audacity
We can use Affirmations to change thoughts or behaviors over time. Negative behavior or thoughts are typically subconscious; this makes them particularly difficult to quash. However, subliminal messages are effective in changing subconscious behaviors. So, pairing these two tools – affirmations and subliminal messages - is a good way to make the changes you desire.
Option 1: Lowering the volume until it’s not consciously audible
While playing your affirmation, use the Playback volume on the Audacity mixer toolbar to reduce the volume to the point where you can barely hear your voice.
Option 2: Using the Audacity plug-in Subliminal.NY
Subliminal is a plug-in, a tool that renders recordings subliminal. Follow the steps below to set up this plug-in for future use.
The plugins code is distributed across the Audacity forum and not available as a single download (as of September 2021).
Latest Subliminal Plugin by steve
Installing & Setup of the Subliminal Plugin (Once only)
Attention
In some case, the installation does not work but lucky there’s also a ready-made plugin that you can install by following step II.
Latest Subliminal Plugin by steve
I. Entering the Nyquist command text for the plug-in
-
From the menu, select Tools, Nyquist prompt, paste in this text.
;nyquist plug-in
;version 1
;type process
;name "Subliminal..."
;action "Subliminal..."
;control carrier "Carrier" real "Hz" 17500 14000 20000

(setf carrier (max 14000 (min carrier 20000)))

;; We have two Nyquist frequencies, carrier/2 and *sound-srate*/2.
;; The CUTOFF is the maximum allowed frequency in the modulator.
;; It must not be greater than carrier/2, but also not greater than
;; the difference between the carrier and *sound-srate*/2, because
;; otherwise the modulated carrier aliases.

(setf cutoff (min (/ carrier 2.0) (- (/ *sound-srate* 2.0) carrier)))

(defun cut (function sound frequency)
(dotimes (ignore 10 sound)
(setf sound (funcall function sound frequency))))

(defun subliminal (sound)
(let ((result (mult 2 (cut #'lowpass8 (hp sound 80) cutoff)
            (hzosc carrier))))
(cut #'highpass8 result carrier)))

(if (< *sound-srate* 44100)
(princ "The track sample frequency must be minimum 44100Hz.")
(multichain-expand #' subliminal s))

-
Click Save.
-
A Save Nyquist script window opens.
-
In the Save in the field, search for your Audacity folder.
-
In File name – type Subliminal
-
The Save as type field should default to Nyquist scripts (*.ny).
-
Click Save.
-
Click OK.
-
The Subliminal effect window opens
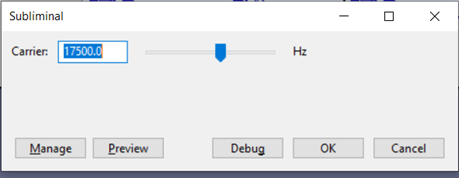
-
Click OK to apply the Subliminal effect to your recording. An installing window briefly appears on your screen.
II. Installing the plug-in
Installing the plug-in allows you to use the Subliminal feature on from the menu in future recordings.
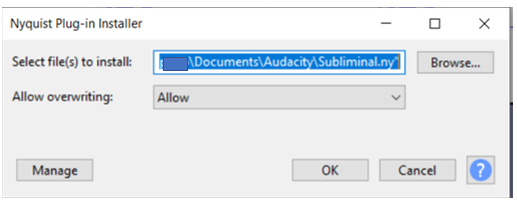
- On the menu, select Tools, Nyquist Plug-in Installer.
- Click Browse, select the Subliminal.ny file in the Audacity folder.
- Click OK,
- Audacity installs the plug-in.
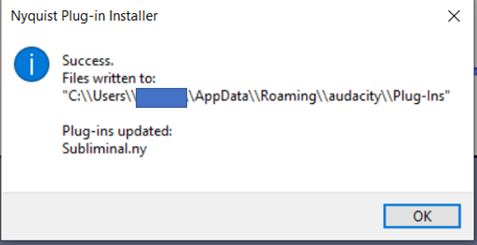
- A confirmation window appears; click OK.
III. Enabling the plug-in
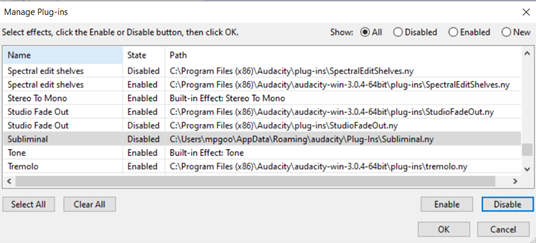
- From the menu, choose Tools, Add/Remove Plug-ins.
- In Show, click All.
- Scroll down to the Subliminal listing, select it, and click Enable.
- Click OK
Applying the Subliminal effect to other recordings.
You can now apply the Subliminal effect from the menu on future recordings.
- Open the recording.
- Press CTRL+A to select the audio track.
- From the menu, choose Effects.
- Scroll to the Subliminal effect.
Step 4: How to add music to the subliminal
If you’d like to add some background music, follow the steps below:
-
Choose File, Import, Audio.
-
Search for the background music you’d like to use
-
Select the file, click Open
-
Audacity displays two tracks, the affirmation, and the music track.
Note – the music track is in stereo, with left/right sub-tracks.
-
Raise your volume back to a normal level.
-
Click CTRL+A to select both tracks, click Play
-
You should now hear the music but note that the track with your affirmation is also playing at the same time.
NOTE – if the affirmation track is shorter than the music track, you can use the Effect, Repeat option to repeat the affirmations track, so it matches the length of the background music. Remember to select the affirmation track only before choosing this option.
We offer awesome royalty-free meditation music for commercial use as pre-made bundles or you can mix your own in our Creator app.
How to export the result as an mp3 or wav file for listening
We need to be able to play the recording outside of Audacity and so will export the recording.
-
On the menu, select File, Export, Export as MP3, the Export Audio window opens.
-
Click File, Export, Export as mp3.
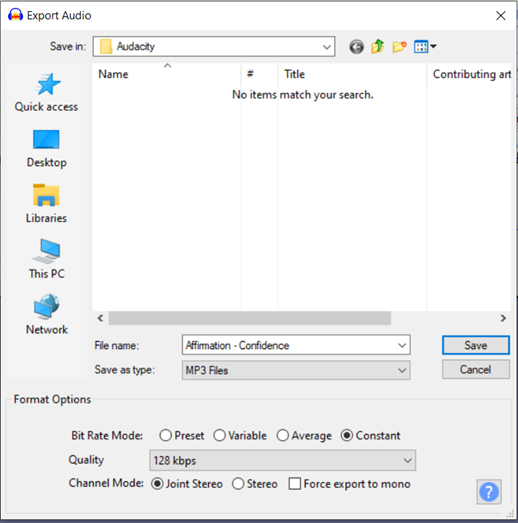
-
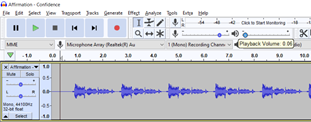
In the File name field, enter a name for your file, e.g., Affirmation – Confidence.
- The Save in field defaults to the Audacity folder; you may change this location if you wish.
- Do not change the remaining options.
-
Click Save
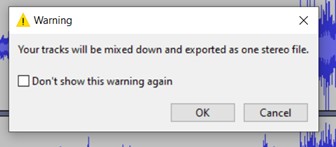
-
A Warning window appears; click OK.
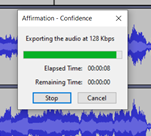
-
An exporting window appears briefly; let it run.
Exiting Audacity & saving the Audacity project
-
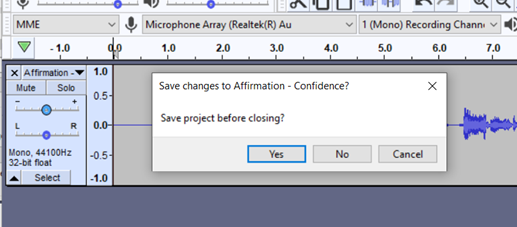
Press CTRL+W to close this project
-
Click Yes; this allows you to come back and edit this recording.
NOTE - If you edit the recording in Audacity, remember to export the updated project
-
Click OK to the warning message that appears next.
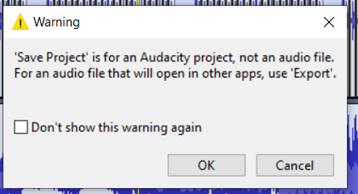
“Don’t show this warning again”. Also has OK and Cancel buttons.
-
In File Name enter a file name.
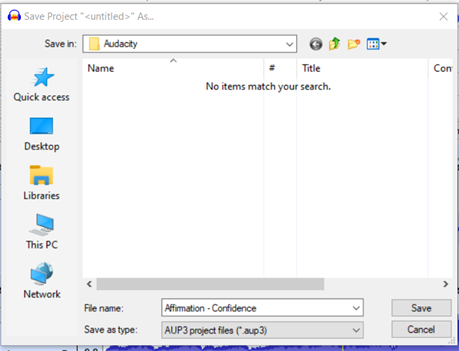
-
Click Save.
-
Your project closes.
-
Choose File, Exit to leave Audacity
How to play affirmations
You can play affirmations while jogging, doing other tasks like driving, working, etc or falling asleep.
Conclusion
Know we finished our guide on how to make subliminal audio with Audacity.
Using affirmations changes behaviors that no longer serve you.
You can pinpoint precisely what behavior or habits you would like to change over time. Creating and recording your own affirmations subliminally allows you to continue your development without being constantly aware of it.
Adding background music increases your receptivity to the affirmations. Including visualizations makes the process more holistic; the more senses you involve, the stronger the impact on your psyche.
Whether the appropriate music is relaxing, rousing, inspiring, by making that choice along with the other steps listed above, you are now taking a step closer to becoming the person you would like to be.
In pairing all the above with music that is relaxing, rousing, inspiring, you are now taking a step closer to becoming the person you would like to be.